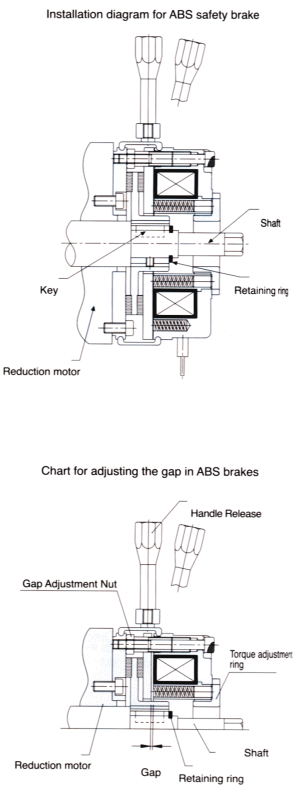
Examples of installation & Application
![]() Basic Design and Operation
Basic Design and Operation ![]() Structure
Structure ![]() Examples of installation & Application
Examples of installation & Application

Although armatures, rotors, and brake faces are machined or even lapped as flat as possible at manufacture, peaks and valleys remain on the surfaces. When a new clutch or brake engages, the contact area is initially confined to the peaks on the mating surfaces. This smaller contact area means torque can be as much as 50%~70% less than the unit’s static torque rating.
To get the full torque, users need to burnish mating surfaces. Burnishing cycles the unit, letting those initial peaks wear down so there is more surface contact between the mating faces. These cycles depending on the amount of torque required, should be lower in inertia, speed, or both, than the end application. Normal operations wear down contact surfaces as burnishing does. Every time a clutch or brake engages during rotation, a certain amount of energy is transferred as heat, please also note that the heat can not be higher than 80℃.
 Checkpoints during installation
Consult JIS B-0401-H7 h6 or js6 for specifications on the fit between the hub and the shaft.
 Leave a small gap between the rotor and the armature to prevent contact. This should be tightly secured with screw on the long end of the shaft.
 All screws must be securely tightened while removing the core in the saddle of the adjustment plate (ABN 0S2~0S8 nuts are used or installation).
 This is a dry type brake, and the friction surface will lose significant torque if it comes in contact with oil. If there are any concerns with oil or dust, a dust guard should be installed to keep out dust and debris.
 Follow specific guidelines closely on safety factors (and components) and connections for connecting the brake coil when hooking up to a power source.
 Adjusting the gap
Variations in the gap between the armature and the magnetic field will affect the release time of the brake. In addition, abrasion of the friction surface will increase this gap over time, and the brake will not release if it becomes to great. Thus the tap should be inspected periodically and adjusted to within the listed specifications.
To make adjustments, loosen the gap nut(#3) and adjust the outer nuts to set the gap (three locations around the circumference, tolerance to within 0.05mm), then re-tighten the nuts.
 Torque adjustment
The ABN 0.2~0.8 torque adjustment of the ABS by tightening or loosening of the three spring nuts is accomplished by tightening or loosening the six screws. This changes the tension of the coil spring and in turn, the torque. Ensure that all nuts are re-tightened after adjustment.


